

Stem : Iatrogenic Pneumothorax following CVP line insertion.

Q. What are ur findings in this XR?
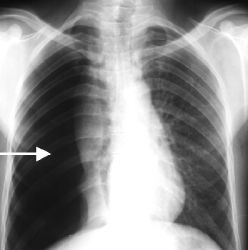
Possible findings that may be seen:
1. Visceral pleural line visible: The normally invisible membrane covering the lung becomes visible when air separates it from the chest wall. This appears as a discrete line paralleling the chest wall.
2. Absent or decreased lung markings in the costophrenic sulcus and periphery: Where the collapsed lung tissue has pulled away from the chest wall, the small linear shadows caused by airway walls are no longer visible.
3. Increased lucency: The pneumothorax appears black on x-ray due to the air accumulated, allowing more x-rays to pass through this area. The surrounding normal lung tissue appears more opaque by comparison.
4. Fluid level: If some fluid (blood) is also present with the air in the pleural space, it will layer dependently due to gravity and be visible on upright x-rays. The air will remain nondependent.
5. Mediastinal shift: The accumulated air can push the mediastinum over to the opposite side, especially in a tension pneumothorax.
6. Tube or catheter position: If a chest tube or needle catheter has already been placed to evacuate the air for management, its position can be confirmed to ensure optimal location in the pleural space.
7. Subcutaneous emphysema: Air trapped in the subcutaneous tissues of the chest wall may also be visible, indicating the likely site of lung puncture during line insertion.
The appearance of a pneumothorax can vary quite significantly depending on the volume of air introduced, positioning of the patient and technique settings. So there may be more or less evidence of the above findings in any particular image. But the key components to recognize are separation of the visceral and parietal pleura, with or without other signs like mediastinal shift, subQ air or effusion.
Is this adequate CXR?
Some key issues:
1. The costophrenic angles (where the ribs meet the diaphragm posteriorly) must be clearly visualized on an upright chest x-ray to rule out a pneumothorax. This is where air will first accumulate in the pleural space, and any pneumothorax will appear as an increased lucency in this area with absent vascular markings.
2. A supine anteroposterior (AP) chest x-ray can still miss a small to moderate pneumothorax, as the air may not fully layer out into an identifiable lucency while the patient is lying flat. An upright chest x-ray provides the most sensitive view for detecting post-procedure pneumothoraces.
3. Inadequate penetration or poor inspiratory effort by the patient can also make the costophrenic angles difficult to properly see on x-ray. A pneumothorax may be obscured if the surrounding lung parenchyma is not well-visualized.
4. Misaligned x-ray beam or improper centering on the midline of the thorax may cut off visualization of the lung bases, again masking the presence of a pneumothorax.
5. Overlying silk sutures, surgical clips or chest tubes from recent procedures in the area of interest can also shield an underlying pneumothorax from view on plain films.
So based on your comment, without clearly seeing both costophrenic angles to confidently rule out increased lucency suggesting air accumulation, this chest x-ray would not be adequate to exclude an iatrogenic pneumothorax. The clinical findings and level of concern for this potential complication should guide what further imaging may be needed:
– Repeat upright PA and lateral CXR for optimal visualization
– Supine vs upright AP films to compare for fluid level or change in pneumothorax size
– Chest CT scan for most definitive and sensitive imaging of the pleural spaces and lung parenchyma
– Consider ultrasound which can detect even small pneumothoraces not seen on initial portable CXR.
Q. System for reading CXR ?
The ABCDE system is a mnemonic used to help radiologists systematically evaluate chest X-rays. The system is as follows:
- Airway: Assess the airway for any abnormalities, such as tracheal deviation, pneumothorax, or effusion.
- Breathing: Assess the lungs for any abnormalities, such as consolidation, collapse, or lesions.
- Circulation: Assess the heart and great vessels for any abnormalities, such as cardiomegaly, pulmonary edema, or aortic aneurysm.
- Diaphragm: Assess the diaphragm for any abnormalities, such as elevation or depression.
- Extras: Assess the chest X-ray for any other abnormalities, such as bone lesions, soft tissue masses, or foreign bodies.
In addition to the ABCDE system, radiologists may also use the RIPE approach to assess chest X-rays. The RIPE approach is as follows:
- Rotation: Assess the chest X-ray for any rotation, which can make it difficult to interpret the findings.
- Inspiration: Assess the chest X-ray for adequate inspiration, which is important for assessing the lungs.
- Picture area: Assess the chest X-ray for adequate picture area, which is important for assessing the heart and great vessels.
- Exposure: Assess the chest X-ray for adequate exposure, which is important for assessing the lungs and soft tissues.
The ABCDE mnemonic provides a helpful framework:
A – Airway: Trachea midline? Pneumothorax or atelectasis present?
B – Breathing: Lung fields clear? Evidence of consolidation, masses, nodules or collapse? Pleural effusion?
C – Circulation: Heart size normal? Great vessels normal? Any mediastinal widening or shift?
D – Diaphragm/Deep sulci: Costophrenic angles sharp? Any free air beneath diaphragm?
E – Everything else: Bones normal? Soft tissues normal? GI tract normal?
Some other key points in your summary:
1. Review the demographics and imaging technicalities: Provides context for the CXR findings and quality.
2. Check rotation/inspiration: Make sure CXR allows for accurate analysis before interpreting findings.
3. Systematically evaluate lung apices, hila, costophrenic recesses: These are common areas for pathology, so closely assess.
4. Exposure adequate: Can you see thoracic vertebral bodies through heart? Indicator of sufficient penetration for diagnostic quality CXR.
5. Technologies: PA vs AP, Supine vs upright, Expiratory vs inspiratory films: Different techniques offer varying visualization of anatomy and pathology.
6. Cardiac shadow: Heart size normal for patient age? Pulmonary vasculature visible extending to periphery?
7. Hila and mediastinum: Normal in size? Any mass effect or lymphadenopathy present?
8. Gastric bubble: Contains air? Located in normal position in LUQ?
9. Bones and soft tissues: No acute fractures or other abnormalities?
Q. How to assess Breathing( post pneumothorax) ?
A thorough respiratory assessment is essential following a pneumothorax to monitor for improvement or worsening. Some key components:
1. Respiratory rate (RR) and rhythm: Increase in RR or development of tachypnea suggests expanding or tension pneumothorax. Irregular breathing pattern may indicate respiratory distress.
2. Oxygen saturation (SpO2): Decreased saturation indicates impaired gas exchange from lung collapse or shift in mediastinum. May require supplemental O2 to maintain adequate levels.
3. Tracheal position: Shift of trachea to opposite unaffected side suggests tension physiology and mediastinal shift. Midline trachea is reassuring.
4. Chest wall movement: Asymmetric chest movement with less expansion on affected side. Paradoxical chest wall movement visible with tension pneumothorax as mediastinum shifts.
5. Respiratory muscle use: Increased work of breathing as accessory muscles of respiration are engaged. Supraclavicular, intercostal and abdominal muscle retraction seen.
6. Breathing pattern: Typical to see shallow, rapid breathing. Grunting or pursed lip breathing may be present if significant dyspnea.
7. Inspection: Cyanosis, especially nailbeds and lips. Accessory muscle use noticeable. Uneven chest rise.
8. Percussion: Hyperresonant or tympanic sound over area of air accumulation in pleural space.
9. Auscultation: Decreased or absent breath sounds on affected side. Mediastinal shift may lead to decreased sounds on opposite side as well.
Other signs:
– Dyspnea: Sensation of chest tightness, shortness of breath or air hunger. Orthopnea and need to sit upright.
– Chest pain: Pleuritic pain over the pneumothorax site due to pleural irritation.
– Tachycardia: Often present due to increased work of breathing, hypoxemia and/or pain.
– Jugular venous distension: May be seen with tension pneumothorax due to impedance of venous return.
Close monitoring for changes in all of these parameters is important in a patient with a known or suspected pneumothorax. Worsening RR, SpO2, dyspnea, chest pain or other signs of respiratory distress may indicate need for emergent decompression with needle or chest tube. Improvement of findings reassures the pneumothorax is resolving, either spontaneously or with current management. Repeat imaging is also often indicated to reassess size of pneumothorax and position of interventions like chest tubes.
Q. Signs of Pneumothorax?
The key signs and findings seen with a pneumothorax, as well as distinguishing features of a tension pneumothorax. Some important points:
Signs of pneumothorax:
• Reduced chest wall movement and breath sounds on affected side: Due to lung collapse away from chest wall.
• Tachypnea and respiratory distress: Body’s response to impaired gas exchange and dyspnea.
• Hypoxemia: Decreased oxygen saturation due to shunting of blood flow past collapsed lung tissue.
• Hyperresonant percussion tone: Air in pleural space transmits a booming, echoing sound with percussion.
• Subcutaneous emphysema: Palpable crepitus under skin from air leak into tissues. Not always present, but pathognomonic when found.
• Chest pain: Sharp, stabbing pain over area of lung collapse, worsened by deep breathing or coughing.
Signs also seen in tension pneumothorax (in addition to above):
• Hypotension and tachycardia: Compromise in venous return to heart due to mediastinal shift.
• Raised jugular venous pressure: Difficulty in venous drainage from head and neck.
• Tracheal deviation: Shift of trachea to opposite unaffected side. Late finding indicating significant mediastinal shift.
• Pulsus paradoxus: Exaggerated fall in systolic BP on inspiration. Due to impedance of ventricular filling.
• Decreased level of consciousness: Develops late as hypotension and hypoxemia worsen.
• Absent unilateral breath sounds: Total lung collapse on affected side with tension physiology.
The clinical manifestations of a tension pneumothorax require emergent decompression with needle or chest tube thoracostomy to prevent life-threatening cardiorespiratory arrest. Immediate management of any pneumothorax is indicated in an unstable or rapidly deteriorating patient, even if not yet exhibiting signs of tension.
Q. Types of pneumothorax ?
There are several types of pneumothorax:
1. Simple pneumothorax: This is the most common type. It results from air leaking into the pleural space from a rupture in the visceral pleura, causing the lung to collapse. It is usually small to moderate in size (<50% of hemithorax) and does not cause significant cardiopulmonary compromise. However, it requires close observation as it can progress to tension physiology if left untreated.
2. Tension pneumothorax: This is a life-threatening emergency. Progressive air leak into the pleural space causes the lung to completely collapse and pushes the mediastinum to the opposite side. It significantly impairs both venous return and pulmonary function. Immediate needle decompression followed by chest tube insertion is required.
3. Open pneumothorax: Results from an open chest wound that allows air to freely enter the pleural space, causing lung collapse. As with simple pneumothorax, it requires close monitoring and prompt chest tube placement for management. Risk of tension physiology developing is high due to unregulated air entry. Surgical closure of chest wound also needed.
4. Traumatic pneumothorax: Follows blunt or penetrating trauma to the chest, resulting in rib fractures or lung laceration allowing air in the pleural space. Often difficult to distinguish from hemothorax on initial imaging. Chest tube insertion commonly indicated for management.
5. Catamenial pneumothorax: A rare type that occurs in women just prior to or during menstruation. Believed to be due to passage of air from the abdomen or diaphragm during menses. Typically right-sided and recurrent. May require hormonal suppressive therapy or surgical treatment for prevention of repeat episodes.
6. Spontaneous pneumothorax: Occurs without known trigger or lung disease, mainly affects young tall thin males. Due to a spontaneous rupture of a small bleb or bulla in the lung, releasing air into pleural space. Prone to recurrence, often treated with pleurodesis via chest tube or surgically.
Q. Difference between tension and simple pnemothorax ?
The key differences between a tension pneumothorax and a simple pneumothorax well. Some important points:
Tension pneumothorax:
• Tracheal deviation away from the affected side: Indicates significant mediastinal shift from accumulated air and lung collapse.
• Hypotension, tachycardia and hypoxemia: Due to impedance of venous return and respiration. Requires immediate decompression.
• Emergent situation: Life-threatening if not promptly drained of air with needle or chest tube.
• Continuous unidirectional air leak: Air enters pleural space but cannot escape, leading to increasing intrathoracic pressure.
• Complete lung collapse: Air accumulation and mediastinal shift compress the entire lung.
• Chest tube insertion: Urgent management along with needle decompression.
Simple pneumothorax:
• Air in pleural space but no physiologic compromise: Smaller amount of air or slower air leak, lung collapse is partial.
• Hemodynamically stable: No significant hypotension, tachycardia or hypoxemia as yet. But close observation required.
• Not an emergent situation: Although requires drainage, patient can be managed with supplemental oxygen and repeat imaging.
• Bi-directional air leak: Some air escapes pleural space, allowing for both entry and exit. Intrathoracic pressure less severely elevated.
• Lung collapse partial: Still some areas of lung remain inflated and adherent to chest wall.
• Needle aspiration: May be sufficient for management, followed by chest tube if significant ongoing air leak or pneumothorax enlarges.
The key takeaway is that while both represent air in the pleural space, a tension pneumothorax requires immediate decompression due to life-threatening physiology, whereas a simple pneumothorax can often be managed less urgently with close observation and repeat imaging, potentially followed by chest tube placement if indicated for resolution. The underlying cause, mechanism of air entry and resulting effects on cardiopulmonary function and anatomy determine the classification and necessary treatment.
Safe triangle of insertion of chest tube ?
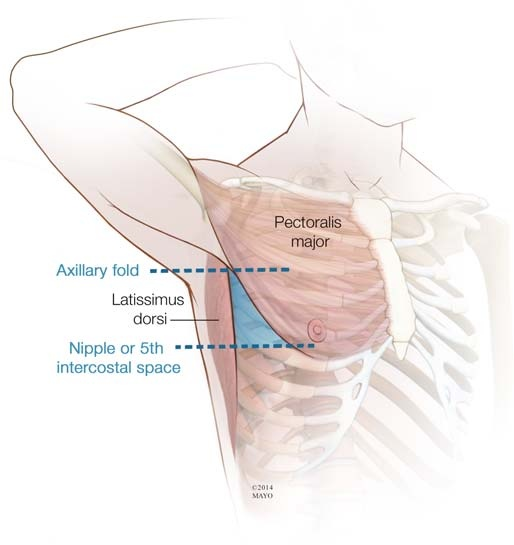
You are correct, the safe triangle for chest tube insertion is:
Anteriorly: Lateral border of pectoralis major muscle
Posteriorly: Mid-axillary line
Inferiorly: A line drawn horizontally at the level of the nipple
Some key points about this insertion site:
1. Avoids major neurovascular structures: The lateral chest wall in this area has no ribs or intercostal spaces, minimizing risks of lung, vessel or nerve injury.
2. Provides direct access to pleural space: This area allows straight insertion into pleural cavity to drain air or fluid.
3. Relatively avascular area: Decreased blood flow lowers risks of significant hemorrhage from chest tube placement.
4. Thinner chest wall: Easier insertion of tube through adipose tissue and muscle in this location.
5. Inferior extension of triangle: For especially large pneumothoraces, the triangle can be extended inferiorly to the 8th intercostal space at the mid-axillary line.
6. Identification of landmarks: Roll patient towards contralateral side, identify the lateral pectoralis border, nipple line and mid-axillary line to clearly delineate the safe triangle borders.
7. Insertion technique: Make a small incision through which blunt dissection is used to tunnel down to pleura. Insert chest tube and secure in place. Connect to water-seal drainage.
8. Complications: Can still include pain, hemorrhage, lung laceration or infection. Monitor patient closely for signs of new or worsening respiratory distress or bleeding.
9. Alternate sites: Include infraclavicular (1st intercostal space, midclavicular line), subcostal (just below costal margin, midclavicular line) or suprasternal/intercostal spaces. Generally avoided if possible due to nearer neurovascular structures.
The safe triangle remains the preferred site for chest tube insertion due to minimal risks and most direct access when performed correctly. Close monitoring of the patient, tube function and insertion site is critical to minimize complications from the procedure. Chest tubes are often left in place for multiple days until resolution of the pneumothorax or fluid collection.
Q. Indications of central line ?
Some key points:
1. Fluid management: When large volume resuscitation is needed or tight fluid balance control is required, central access allows for rapid infusion and CVP monitoring.
2. Parenteral nutrition: Central lines provide adequate lumen size and flow rates for total parenteral nutrition when enteral feeding is not possible.
3. Medication administration: Certain drugs like potassium, chemo agents and antibiotics require central venous access due to vesicant or irritant properties.
4. Difficult peripheral access: For patients with poor peripheral venous access, a central line provides reliable long-term access for fluids, medications and blood products.
5. Renal replacement therapy: Central venous catheters are required for hemodialysis and other renal replacement modalities when native kidneys are not functioning.
6. Cardiac pacing: Temporary transvenous pacemaker leads can be placed through a central line during cardiac procedures or when pacing is urgently needed.
7. Hemodynamic monitoring: Central venous pressure (CVP) obtained from a central line assists in evaluating intravascular volume status and response to fluids. Some central lines also allow cardiac output monitoring.
8. Long term IV access: When IV therapy is anticipated to be required for weeks to months, a central line prevents need for repeated peripheral IV starts.
9. Chemotherapy: The large lumens and proximal insertion site of central lines provide adequate flow rates for administration of chemotherapy agents. Reduces risks of extravasation.
The benefits of a central line must always be weighed against the potential complications from their insertion and use. These include infection, thrombosis, hemorrhage, arrhythmia, pneumothorax, and line occlusion or fracture. With proper technique, sterile precautions and evidence-based maintenance practices, the risks can be minimized. But close monitoring for any signs of line-related issues is essential to ensure patient safety.
Q. Complications of central venous line insertion ?
major potential complications associated with central venous catheter insertion and use. Some key points:
1. Infection: Most common complication, especially with long term use. Can lead to catheter-related bloodstream infections which may become severe if not treated promptly. Strict sterile technique during insertion and proper maintenance practices help minimize risk.
2. Thrombosis: Can occur both locally at the catheter site as well as more remotely as a DVT. Adequate flushing and anticoagulation, when possible, are preventative. Watch for signs like arm swelling, pain or line dysfunction.
3. Pneumothorax: More likely with subclavian or internal jugular approaches due to proximitry to lung apex. Close post-procedural monitoring with chest x-ray to check for inadvertent pleural puncture.
4. Hemorrhage: Can cause hemothorax if lung or great vessels punctured, or neck hematoma from carotid or jugular puncture. Apply adequate pressure post-removal and monitor for signs of ongoing bleeding.
5. Arterial puncture: Can lead to pseudoaneurysm or arteriovenous fistula formation. Apply prolonged pressure to achieve hemostasis and monitor site for pulsatile mass or bruit.
6. Air embolism: More likely in upright sitting position during subclavian catheterization. Trendelenburg positioning and occlusion of insertion site with finger or clamp can prevent air entry when catheter is removed.
7. Chylothorax: Associated with left internal jugular cannulation due to proximity to thoracic duct. Appears as milky, fatty fluid draining from chest tube. May require surgical ligation of duct for treatment.
8. Cardiac tamponade: Rare but life-threatening complication if guidewire or catheter perforates the right atrium or ventricle. Emergent pericardiocentesis and drainage are required.
9. Arrhythmia: Mechanical irritation of the cardiac conduction system can occur during placement in superior vena cava or right atrium. Usually transient but may require intervention if hypotension or symptoms develop.
Close observation and monitoring are essential to identify any complications early, especially in the period immediately following central line insertion. Many of the issues that arise can become life-threatening if not promptly diagnosed and properly managed. Maintaining a high index of suspicion for common problems like infection or thrombosis is also key to avoiding line-related morbidity and achieving good outcomes.
Q. Immediate Complications of CVP line?
A pneumothorax is a potentially life-threatening complication that can occur during or immediately after central venous catheter insertion, especially with subclavian or internal jugular approaches.
Cause: Inadvertent puncture of the lung pleura during insertion or guidewire/catheter manipulation allows air entry into pleural space.
Management:
– Simple: Supplemental oxygen, close observation. May require needle aspiration or chest tube insertion if enlarging or patient compromised.
– Tension: Medical emergency – immediate needle decompression followed by chest tube insertion. High-flow oxygen.
Prevention: Strict sterile technique, ultrasonographic guidance, experienced operator, proper patient positioning, clamping of the inner stylet during central line insertion and removal.
Causes/ Predisposing factors of Late CVP line infection?
There are several factors that can predispose to late central venous catheter infections:
1. Biofilm formation: Over time, microorganisms adhere to the catheter surface and secrete a polysaccharide matrix forming a biofilm. This shields them from host defenses and antimicrobials, serving as a persistent source of infection.
2. Catheter hub contamination: The catheter hub is the most common point of entry for microorganisms leading to CRBSI. Improper handling or breaks in sterile technique during access provide an opportunity for pathogens to gain entry.
3. Immune dysfunction: Patients with impaired immunity are more susceptible to developing catheter-related infections due to decreased ability to fight off pathogens. Conditions like malignancy, diabetes, chronic steroids all increase risk.
4. Prolonged catheter dwell time: The longer a central line remains in place, the higher the infection risk becomes. Replace or remove catheters as soon as no longer needed to limit this risk.
5. Inadequate catheter site care: Poor catheter site cleaning or dressing changes extend the opportunity for microbes to gain access to the catheter tract and lumen. Strict site care protocols must be followed.
6. Heavy microbial colonization: Some patients may be more heavily colonized with potential pathogens, especially Staphylococcus species, increasing risks of eventual CRBSI. Identifying these patients can help guide preventative strategies.
7. Infusate contamination: Fluids, medications or TPN administered through the central line can become contaminated during preparation or delivery, introducing microbes directly into the bloodstream. Strict IV preparation procedures must be followed.
8. Thrombosis: Clot formation within or around the central venous catheter provides protected surface area for microbes to establish infection that is difficult to eradicate without catheter removal. Anticoagulation when possible may help lower risk.
The key to prevention of late CRBSIs is limiting opportunity for microorganisms to gain access to the catheter through meticulous insertion technique, proper site care, catheter maintenance and hub access procedures. Patients at high risk due to immune dysfunction or heavy colonization may require additional strategies like antimicrobial coated catheters or antibiotic lock therapy. But catheter removal as soon as no longer needed remains the most effective way of avoiding infection.
Q. NICE guidlines for insertion ?
NICE guidelines for central venous catheter insertion. Some important points:
1. Ultrasound guidance: Use of ultrasound during insertion significantly reduces complication risks by allowing direct visualization of anatomy and catheter placement. Considered standard of care, especially for internal jugular cannulation.
2. Post-procedural chest x-ray: Obtaining a chest radiograph immediately after central line insertion confirms proper tip placement above the pericardial sac and absence of pneumothorax. Tip in lower 1/3 of SVC is ideal. Required before use of the catheter.
3. Pre-procedure checks:
– Coagulation studies: PT/INR and platelet count must be checked beforehand to ensure adequate hemostasis for the procedure. May require reversal or transfusion.
– Microbiology: Checking for bloodstream infection, especially in immunocompromised patients. May alter choice of catheter type or require treatment before insertion.
– Consent: Informed consent must be obtained from the patient or substitute decision maker prior to insertion, including risks of complications.
– Imaging: Recent chest x-ray provides anatomical landmarks for ultrasound guided access and post-insertion film comparison.
– Resuscitation equipment: Having a crash cart, defibrillator, and difficult airway equipment on hand in the rare event of a life-threatening complication.
4. Aseptic non-touch technique: Strict sterile technique including hand washing, full sterile gowning, gloves, cap, mask and large sterile drapes must be followed to avoid introducing microbes during insertion.
5. Catheter selection: Consider patient factors like duration of need, antimicrobial impregnation, hemodialysis use, etc. to choose the most appropriate catheter for the clinical situation. Triple lumen catheters are most versatile.
6. Sedation: Provision of adequate sedation and analgesia during insertion, especially for jugular or femoral approaches. Helps ensure patient comfort and cooperation. Monitor throughout procedure.
7. Post-insertion care: Careful monitoring for at least 30-60 minutes after insertion recommended to identify any immediate complications. Formal site care, dressing changes and hub access procedures must then be followed to minimize infection risks.
The NICE guidelines aim to provide recommendations for best practices in central venous access to optimize outcomes and reduce avoidable harms. Following evidence-based insertion, maintenance and monitoring procedures has been shown to limit complications from these devices when used for necessary IV access.
Q. Technique for insertion of central venous line : ( IJV) ?
Key steps for safe insertion of an internal jugular central venous catheter:
1. Trendelenburg position: Head down positioning distends the veins of the neck, making the internal jugular vein more prominent and easier to cannulate. May elevate legs for added benefit.
2. Locate landmarks: Palpate the clavicle, sternal and clavicular heads of the sternocleidomastoid muscle. The internal jugular vein runs in the center of the triangle formed between these structures.
3. Palpate the carotid pulse: Helps identify the position of the carotid artery so the needle can be inserted lateral to this, minimizing risks of arterial puncture.
4. Needle insertion: Insert the needle with attached syringe at a 30 degree angle aimed at the ipsilateral nipple, while aspirating gently. Dark venous blood will flash back when the IJV is entered.
5. Confirm venous access: Free flow of dark blood easily aspirated confirms needle is properly placed in the vein. Blood flows in synchrony with respiration if in IJV.
6. Seldinger technique: Pass the guidewire through the needle, then remove the needle over the wire. Pass the dilator over the wire to slightly enlarge the tract, then pass the catheter over the wire into the vein.
7. Remove guidewire: Once catheter is in proper position with tip in distal SVC, remove the guidewire while stabilizing catheter to maintain position.
8. Suture in place: Use 2-0 silk sutures to anchor the catheter hub to the skin at insertion site. Allows stabilizing while still allowing some mobility. Dressing applied.
9. Post-procedure CXR: Confirm catheter tip position above pericardial sac and ensure no pneumothorax prior to use.
10. Surface marking: A line drawn from the ear lobe to the medial end of the clavicle approximates the course of the internal jugular vein for identification of insertion site.
11. Ultrasound guidance: Use of ultrasound for vein localization and real-time guidance of needle and wire insertion significantly improves safety by allowing direct visualization of anatomy during the procedure. Highly recommended.
Q. Removal technique?
Proper technique during removal of a central venous catheter is important to prevent potential complications like air embolism or hemorrhage. Some key points:
1. Trendelenburg positioning: Placing the patient in a head down position during removal helps prevent air entry into the catheter due to negative intrathoracic pressure on inspiration. This is especially important when removing catheters from the internal jugular or subclavian position.
2. Clamping: Clamp the catheter proximal to the insertion site prior to suture removal or cutting to avoid air entry through the open lumen. Maintain clamp in place until catheter fully removed from vessel.
3. Suture removal: Remove any anchoring sutures along the catheter at the skin to allow gradual removal from the vein while stabilizing the remaining portion in place. Removing all sutures at once risks inadvertent rapid removal or air entry.
4. Apply pressure dressing: Have a sterile gauze and pressure dressing ready at the insertion site to apply as soon as catheter is fully removed to achieve hemostasis. Pressure should be held firmly in place for at least 10-15 minutes.
5. Secure pressure dressing: Wrap an elastic pressure bandage, cloth tape or tie around the gauze to help maintain firm pressure over the site after removal. This minimizes risks of delayed bleeding from the insertion tract. Monitor site closely for 1-2 hours after for signs of ongoing bleeding.
6. Post-removal chest x-ray: Obtain a chest radiograph following removal of the catheter to confirm absence of pneumothorax, especially if through subclavian or internal jugular approach. Check catheter tip to ensure complete removal.
7. Patient education: Educate the patient on signs and symptoms to monitor for at home including chest pain, shortness of breath, arm swelling (DVT) or bleeding from the insertion site. Instruct them to seek immediate medical care if any concerning symptoms develop.
With careful attention to technique and post-removal monitoring, central venous catheters can usually be removed without complications. But due to the invasive nature of these devices, patients remain at risk for potential issues for some time after removal. Maintaining safety through best practices, patient education and follow up care helps achieve the best outcomes.
Indications of removal?
Indications for removal of a central venous catheter:
1. No longer required: The catheter is no longer needed for medications, fluids, nutrition or monitoring. Remove as soon as access is no longer necessary to limit risks of complications.
2. Infection: If a catheter-related bloodstream infection is suspected or proven, the catheter should be removed. In some cases, guidewire exchange over a new sterile catheter is an option if access must be immediately re-established.
3. Thrombosis: If a DVT or catheter-associated thrombosis is identified, the catheter should be removed unless absolutely required for care and anticoagulation therapy initiated. Clots pose risks of embolization and persistent access issues.
4. Dysfunction: If a catheter is not functioning properly for infusion, withdrawal of blood or monitoring, it must be removed and a new catheter placed in a different location.
5. Cardiac recovery: Following resolution of acute cardiac conditions requiring inotropic support through a central line, the catheter should be removed as peripheral or oral access is sufficient for ongoing needs.
6. Discharge planning: Prior to discharging a patient home or to a lower level of care, any unnecessarily central venous access should be removed. Peripheral cannulation sufficient for most home going needs.
7. Pneumothorax: If a pneumothorax develops due to central line insertion, the line should be immediately removed unless absolutely critical for short term access in an emergency. Chest tube also usually required.
8. Patient request: A patient may request removal of their central line for various reasons in which case the risks and benefits of doing so versus retaining the access must be discussed. If possible, it is best removed unless still clinically indicated.
As with the insertion, meticulous removal technique is important for central venous catheters to avoid complications. But prompt removal of any unneeded catheters reduces risks for patients including access complications, nosocomial infections, and venous thrombosis. Patient safety through avoidance of avoidable harms is a key driver for ensuring these devices are in place only when essential and no longer.
Sites for inserting a central venous line?
The most common sites for central venous access include:
1. Internal jugular vein: Located in the neck, provides straight-line access to the superior vena cava and right atrium. Low infection risk but higher risks of pneumothorax and vascular/nerve injury due to proximity of critical structures. Ultrasound guidance recommended.
2. Subclavian vein: Located below the clavicle, also provides access to the SVC and RA. Similar risks to internal jugular cannulation including pneumothorax. Higher technical difficulty and risks of subclavian artery puncture. Ultrasound guidance also recommended.
3. Femoral vein: Located in the groin/thigh, provides access to the inferior vena cava. Lower risks of pneumothorax but higher infection risks due to heavier microbial colonization at the site. Higher thrombosis risk due to venous stasis in lower extremities. Avoid if possible for long term access.
4. Peripherally inserted central catheters (PICC): Inserted into the deep veins of the arm (cephalic, basilic, brachial), threads up to the SVC. Lower risks overall but provide more limited flow rates, smaller bore catheters. Best for non-emergent, longer term access for fluids and medications when peripheral IV not possible.
5. Tunneled catheters (e.g. Hickman): Anchored subcutaneously with fistula tract created from insertion site to vein. Lower infection risks for long term use. Require minor surgical procedure for insertion and removal.
6. Implanted ports (e.g. Port-a-Cath): Placed under the skin with catheter tunneled to central vein. Access via needles through silicone septum. Lowest infection risks for permanent long term access but risks bleeding and thrombosis at access site. Require surgical insertion and removal.
In summary, the ideal site for central access depends on patient specifics like duration of need, therapies required and risks, as well as technical factors related to each location. Ultrasound guidance and meticulous sterile technique are key to safe insertion and achieving good outcomes regardless of where the catheter is placed. But choosing the most appropriate site for the situation helps minimize avoidable complications.
Q. Organism causing infection ?
Staphylococcus epidermidis is a common cause of central line-associated bloodstream infections (CLABSIs). Some key points:
1. Normal skin flora: S. epidermidis is a coagulase-negative staphylococci that colonizes the skin and mucous membranes of humans. It gains access to the central line tract and catheter lumen through breaks in sterile technique during insertion or hub access.
2. Biofilm formation: S. epidermidis is able to adhere to foreign bodies like catheters and secrete a polysaccharide matrix that forms a biofilm. This protects the organisms from host defenses and antimicrobials, allowing infections to become persistent.
3. Usually low virulence: Although able to cause invasive disease in immunosuppressed or catheterized patients, S. epidermidis is a lower virulence organism. However, due to its ability to form biofilms on catheters, it frequently causes indolent and hard to clear CLABSIs, especially with long term devices in place.
4. Diagnosis: Growth of >15 colony forming units from catheter tip cultures or simultaneous growth from catheter tip and peripheral blood cultures provides microbiological diagnosis. Paired quantitative blood cultures from the CVC and peripheral site may identify catheter as source.
5. Treatment: Initial treatment is usually empiric antibiotics (vancomycin, daptomycin) until susceptibilities are available to direct therapy. Catheter removal, when possible, provides the highest chance of cure. If the catheter must remain, high dose bactericidal locks (antibiotics instilled into the lumen) may help clear the infection but risks relapse.
6. Prevention: Meticulous aseptic technique during insertion and hub access is key. Antimicrobial coated or impregnated catheters may be used for high-risk long term access. Chlorhexidine bathing prior to insertion reduces skin colonization. Hub protection caps when lines not in active use prevent contamination.
Due to its ability to form tenacious biofilms on catheters, S. epidermidis remains a leading cause of CLABSIs even with advanced preventative strategies. While virulence is lower, these infections frequently become persistent and difficult to fully clear without catheter removal. Limiting all potential routes of entry of this common skin organism into the catheter tract and lumen is essential to improving outcomes.
Q. How to prevent line infection ?
Recommendations for preventing central line associated bloodstream infections (CLABSIs):
1. Hand hygiene: Proper hand washing or disinfection before and after handling central lines or their components is key. This removes potential pathogens and avoids introducing them into the catheter tract or lumen.
2. Skin antisepsis: Thoroughly preparing the insertion site with an appropriate antiseptic like chlorhexidine gluconate helps reduce skin flora that can gain access during insertion. Allow to completely dry to maximize effectiveness.
3. Maximal sterile barriers: Use of sterile gown, gloves, cap, mask and large drape during insertion provides a sterile field and protects the catheter from contamination during the procedure. Strict adherence to aseptic technique is essential.
4. Meticulous insertion technique: Following recommended practices for safe CVC insertion including proper positioning, ultrasound guidance, etc. minimizes risks of puncturing surrounding structures or contaminating the catheter during placement.
5. Routine catheter care: Implementing standardized procedures for hub access, dressing changes, catheter maintenance and replacement helps prevent contamination of the line after insertion. Scrupulous nursing care is key.
6. Prompt removal: Removing catheters as soon as they are no longer clinically indicated eliminates potential routes for infection to develop. The longer a line remains in place, the higher the risks become.
7. Healthcare personnel education: Provide regular training on CLABSI prevention practices, aseptic technique and catheter care for all staff involved in inserting, accessing or maintaining central lines. Continual reinforcement and monitoring of practices is necessary.
8. Surveillance: Monitor rates of CLABSI through ongoing surveillance of all central lines. Identify opportunities for improvement by investigating each infection to determine potential breaches in practice or procedure. Provide feedback to staff.
Implementing evidence-based strategies through policy, practice and education at all levels within a healthcare organization has been shown to significantly reduce CLABSI rates. But consistent application of recommended interventions from insertion through removal of each device, and commitment to continuous quality improvement, are necessary to achieving the best outcomes. Prevention truly begins at the bedside with each interaction staff have with every central line.
Q. Investigations to do when SOB ?
When a patient presents with shortness of breath (SOB), some important investigations to consider include:
1. Chest X-ray: A chest radiograph is useful to assess for underlying lung pathologies that may be contributing to dyspnea. Look for signs of pneumonia, pulmonary edema, pleural effusion, pneumothorax, or other acute cardiopulmonary process. Comparison with prior films also helpful.
2. Arterial blood gas (ABG): An ABG provides information about the oxygenation and ventilation status. Look for signs of hypoxemia (low PaO2), hypercapnia (high PaCO2), acidosis (low pH) or other electrolyte disturbances. ABG is especially important in acute severe SOB to determine need for intubation and mechanical ventilation.
3. Electrocardiogram (ECG): Obtain a 12-lead ECG to assess for potential cardiac causes of dyspnea such as heart failure, myocardial ischemia or infarction, arrhythmias. Changes from baseline ECG may help determine etiology.
4. Troponins: Measure troponin levels if cardiac ischemia is suspected. Elevated troponins in the right clinical context would suggest myocardial infarction as a contributing cause of SOB and chest discomfort.
5. D-dimer: If pulmonary embolism is considered, especially in patients with risk factors, a d-dimer blood test can help rule in or out this diagnosis. Higher levels make PE more likely and CT pulmonary angiography should be pursued.
6. BNP: In patients with a cardiac history, B-type natriuretic peptide levels can help determine if heart failure may be exacerbated, contributing to worsening SOB. Elevated BNP would warrant further cardiac investigations.
7. Blood work: Additional investigations like CBC, electrolytes, renal function, magnesium, phosphorus levels can identify other potential contributors including anemia, acid-base disturbances, electrolyte abnormalities.
The acuity and severity of a patient’s shortness of breath helps guide which investigations are most urgently needed. In moderate or mild acute SOB, chest x-ray, ECG, ABG and blood work are usually sufficient for initial assessment. But in severe or life-threatening dyspnea of uncertain etiology, all options must be considered including more advanced imaging like CT scans to determine appropriate treatment. The key is to not delay in obtaining essential information that will properly inform patient management and stabilization.
Q. landmark IJV ?
Important landmarks for internal jugular vein cannulation include:
1. Carotid artery: The internal jugular vein runs lateral to the carotid artery in the neck. Palpating the carotid pulse helps identify its location so the IJV can be accessed medial to this, avoiding arterial puncture.
2. Sternocleidomastoid muscle (SCM): The sternal and clavicular heads of SCM flank the IJV. The vein runs in the groove between these two muscle heads, so identifying them helps guide proper insertion site and angle.
3. Direction of ipsilateral nipple: The needle should be inserted aiming at the ipsilateral nipple to properly intersect the internal jugular vein. An angle of 30 degrees cephalad in the coronal plane is typically recommended.
4. Head rotation: Rotating the head slightly to the contralateral side helps distend the IJV on the side of insertion, making it more prominent. This further minimizes risks of puncturing surrounding structures.
5. Trendelenburg positioning: Placing the patient in a head down position fills the internal jugular vein with blood, causing it to swell in size. This again makes the vein an easier target for cannulation and limits chances of accessing an adjacent artery or neural structure.
Using anatomic landmarks and proper patient positioning helps guide safe and accurate access of the internal jugular vein. But due to the proximity of critical nerves, arteries and thoracic structures in this area, ultrasound guidance during cannulation provides the greatest safety. Visualizing the introduction of the needle, guidewire and catheter into the IJV in real time allows the provider to avoid adjacent vessels and immediately identify any damage to avoid complications.
Q. Higher point you can insert into IJV?
The ideal insertion point for an internal jugular central venous catheter is at the apex of the triangle formed by the lateral border of the sternal head of the sternocleidomastoid muscle and the medial border of the clavicular head of the sternocleidomastoid muscle. This typically corresponds to the level of the cricoid cartilage. Some key points:
1. Higher insertion increases risk of carotid artery puncture: The farther superior (closer to the head) you insert into the internal jugular vein, the closer in proximity the vein and carotid artery become. This significantly increases risks of accidentally accessing the artery during insertion or dilation.
2. Higher insertion limits catheter length: Inserting at a higher level in the neck reduces how far the catheter can thread into the vein before running out of vessel and risks damagin the wall. The tip must still reach the lower third of the superior vena cava for proper positioning.
3. Difficulty advancing guidewire: If inserted too high, it may be difficult to smoothly advance the guidewire and catheter due to more acute angles within the vein at higher levels in the neck. This can increase chances of vein wall damage or guidewire/catheter knotting.
4. Increased risks to surrounding structures: Higher in the neck, the internal jugular vein is more closely surrounded by critical nerves (vagus, phrenic) and thoracic structures. Access at lower levels minimizes risks to these adjacent elements.
5. Less ideal for central venous pressure monitoring: If CVP monitoring will be required through the central line, lower insertion at the level of the right atrium allows most accurate readings. Higher insertion further from the heart may lead to dampened or less precise data.
6. Less suitable for large bore catheters: Larger triple lumen or introducer sheath/catheter combinations may not pass as easily through a higher internal jugular puncture site due to narrowing of the vein at more superior levels. This could limit options for catheter type selection.
In summary, the ideal insertion site for an internal jugular central venous catheter is the apex of the neck, lateral to and below the cricoid cartilage. This area provides good straight-line access into a sufficiently wide portion of the vein to allow ideal positioning of most catheter types while minimizing risks to surrounding structures and allowing accurate CVP monitoring if required. But in an emergency, or if lower areas are inaccessible, an experienced operator can safely insert into higher portions of the IJV with the aid of real-time ultrasound guidance.
Q. How do you manage this (pneumothorax)?
Management of a pneumothorax depends on the severity, but may include:
1. Supplemental oxygen: Provide supplemental oxygen to maximize oxygenation. High flow oxygen increases dissolved oxygen in the blood to overcome small pneumothoraces.
2. Chest tube placement: For tension pneumothorax or a pneumothorax causing significant respiratory distress, chest tube placement is required to evacuate air from the pleural space. A large bore chest tube is inserted into the 2nd intercostal space at the midclavicular line.
3. Needle decompression: If tension pneumothorax is life threatening, emergency decompression can be achieved by inserting a large needle / cannula into the 2nd intercostal space at the midclavicular line. A chest tube is then still usually needed but the needle buys time.
4. Hospital admission: Patients with significant pneumothorax should be admitted to hospital for observation and management. Smaller pneumos may still require admission in patients with underlying lung disease or risk factors.
5. Surgery consultation: For persistent or recurrent pneumothoraces, surgical interventions like thoracotomy or video-assisted thoracic surgery (VATS) may be recommended to mechanically or chemically ablate parts of the lung to minimize recurrence risks.
6. Follow up imaging: Repeat chest x-ray is required following any procedure to evacuate air and ensure complete lung re-expansion with resolution of pneumothorax prior to removing chest tubes or discharging the patient.
7. Address underlying causes: If pneumothorax was due to underlying lung disease (emphysema, COPD, asthma) or trauma, the cause should be addressed which may include surgical resection of blebs or bullae, smoking cessation, or management of infections.
Prompt recognition and management of pneumothorax, particularly tension, hemothorax or bilateral pneumothoraces is critical to prevent hypoxemia or obstructive shock. Initial steps focus on relieving pressure by draining air from around the lung, then diagnosis and correction of the underlying cause. Admission for observation is usually required to ensure lung re-expansion remains stable prior to discharge. Hasty discharge risks recurrence which endangers the patient and requires repeat intervention.
Patient suddenly becomes SOB and hypoxic. What is happening? What do you do? Where to insert needle?
This is a medical emergency and requires immediate decompression. Key steps:
1. Sudden shortness of breath and hypoxemia: A tension pneumothorax will cause severe respiratory distress and oxygen desaturation due to loss of pulmonary function on the affected side. The positive pressure in the pleural space also causes mediastinal shift which compromises function of the unaffected lung.
2. Needle thoracocentesis: To urgently relieve life-threatening pleural pressure, a large bore needle or IV cannula is inserted into the pleural space. This is an emergency procedure to stabilize the patient until a chest tube can be placed.
3. Site for needle insertion – 2nd ICS MCL: The preferred site for needle decompression is the midclavicular line at the level of the second intercostal space. Insert the needle into the top area of the space to ensure entry into the pleural cavity.
4. IMMEDIATE chest tube placement: Following needle decompression, a chest tube must be inserted promptly to fully evacuate air and any blood from the pleural space, allowing the lung to re-expand. A tension pneumothorax will recur rapidly otherwise, so chest tube insertion should follow needle decompression as soon as possible.
5. Admission to critical care: Any patient treated for a tension pneumothorax requires admission to an intensive care or high dependency setting for close monitoring and management. The underlying cause of pneumothorax must be determined and may require surgical consultation for definitive treatment to prevent recurrence.
6. Address cause: The precipitating cause of tension pneumothorax must be determined and addressed which may include:
•Lung disease (COPD, asthma, emphysema): May require surgical pleurodesis or bullectomy
•Traumatic pneumothorax: May require thoracotomy and repair of lung laceration.
•Iatrogenic (central line placement): review procedure for breaks in sterile technique and insert new line if still required using ultrasound guidance.
A tension pneumothorax is a life-threatening emergency that requires prompt recognition and management to prevent rapid clinical deterioration. Urgent decompression with needle, then chest tube provides the critical first steps but admission and treatment of the underlying cause are essential to achieving good long-term outcomes and avoid recurrence. When caught and managed properly, most patients will recover well but anticipate hospitalization for further monitoring and procedures to definitively resolve the pneumothorax.
Recommended way to insert jugular CVP ,NICE guidelines ?
According to NICE guidelines and best practices, the recommended way to insert an internal jugular central venous catheter includes:
1. Ultrasound guidance: Ultrasound should be used to guide cannulation of the internal jugular vein. This allows for direct visualization of the vein, needle and wire to minimize risks of complications like arterial puncture, hemothorax or pneumothorax.
2. Sterile technique: Strict aseptic technique must be adhered to during insertion to prevent catheter related infections. The use of maximal sterile barriers including sterile gown, gloves, cap, mask and large drape are recommended.
3. Confirm catheter position: A post-insertion chest x-ray is required to confirm proper positioning of the catheter. The tip should sit just above or within the lower third of the superior vena cava. Malpositioning requires adjustment or replacement of the catheter.
4. Rule out pneumothorax: The post-procedural chest radiograph also evaluates for potential complications like pneumothorax or hemothorax from the procedure. If detected, further management is required before the CVC can be safely used.
5. ECG guidance: In addition to ultrasound, ECG guidance can be used during insertion to detect proximity to the heart. Changes in waveform on the ECG indicate the catheter tip is close to the right atrium which helps confirm ideal positioning.
6. Review imaging: The clinicians inserting the CVC should review the post-insertion chest radiograph themselves to ensure proper positioning before the catheter is used or depended upon for medications, measurement or monitoring.
7. Documentation: Full documentation of the procedure including indications, ultrasound and patient monitoring findings, post-insertion chest x-ray interpretation and plan for on-going care of the CVC is required for patient safety and continuity of care.
8. Ongoing monitoring: While in situ, the CVC should be monitored regularly for signs of catheter-related infection or thrombosis and managed promptly per recommended guidelines. CVCs should be routinely replaced no more than every 7 days if long term access is required.
Central venous cannulation has potentially life-threatening risks if not performed properly and monitored diligently. Following best practices for insertion and ongoing care helps minimize harms, but patient safety depends on consistent application of evidence-based guidelines by all clinicians involved during their interaction with the device. Close surveillance and a standard approach from insertion through removal provides optimal outcomes.